Importing
Closed Caption Files into QuickScan ProMedia 3
|
|
||
|
|
Import Method 2 - Enter Delimiters Manually outside of
QuickScan then Import Automatically |
|
|
|
Import Method 3 – Auto Parse by a Time Interval or
Delimiter then Import Automatically |
|
|
|
 The first step for importing Closed Caption
(CC) files is to make sure that you have the broadcasts setup correctly in the
QuickScan Broadcast database. You get
to this database by clicking the Media button on QuickScan’s main menu
screen. Input the broadcasters and then
input each program for each broadcaster.
The first step for importing Closed Caption
(CC) files is to make sure that you have the broadcasts setup correctly in the
QuickScan Broadcast database. You get
to this database by clicking the Media button on QuickScan’s main menu
screen. Input the broadcasters and then
input each program for each broadcaster.
For
each program-record there will be a field called “Delimiter” and another called
“Parse Interval”. What is entered (or
not entered) into these fields will determine how QuickScan handles the CC file
imported for that particular program.
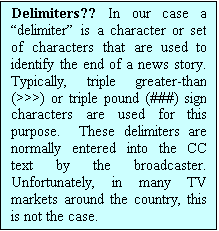
Before we go any further you should determine which, if any, delimiter characters are being used in the broadcasts that you monitor. You can do this by opening the CC file in a text editor (such as Notepad or WordPad) and taking a look. Once you’ve determined this you can enter the delimiter character being used into the appropriate field in Broadcasts database screen (shown below).
If
the CC file does not contain delimiter characters to identify the end of a
story, you’ll have two or three other choices of how to import it:
- Auto Parse, by Time
Interval
- Enter a time interval into the “Parse Interval” field. This will tell QuickScan to
automatically break the broadcast into segments that are the length of the
interval that you’ve entered (e.g. 01:00, one minute; 00:30, thirty
seconds; etc.). This is handy when
you don’t need to take the time to determine where the precise beginning
and ending of each story is.
- Manual Parse –
- Within QuickScan - Leave both the
Delimiter field and the Parse Interval field blank. This tells QuickScan that you don’t want
to import this CC file with one of the ‘automatic’ methods. You can then
use QuickScan’s handy parsing screen to manually parse each story. More information about parsing is
given below.
-
Outside QuickScan - Enter delimiter characters manually into the CC file using a text editor (Notepad, WordPad, etc.). This method is often preferred when there are no delimiters provided by the broadcaster because you can easily enter delimiter characters into the file with a text editor and then import all your CC files at once, ‘automatically’. If you use this method, you’ll need to enter the delimiter characters you’re going to use into the ‘Delimiter’ field so QuickScan will know what to look for.Type a ‘Delimiter’ OR a ‘Parse Interval’ OR leave both fields blank to parse manually within QuickScan. If Delimiters are added manually outside of QuickScan, with a text editor, type in the Delimiter that will be used.
![]()


Initial Setup - Step 2
You
must now decide where your CC files will be created and stored. QuickScan needs to know this information in
order to find the CC files to import them and then to archive them correctly
once they’ve been imported.
1.
Create
two sub-folders for your CC files. One
for the newly created files and one to store files once they’ve been imported
(you can delete these files later or store them somewhere else). It is recommended that you create these
folders as sub-folders in the ‘common’ folder where QuickScan’s other main data
is kept.
§
On
a stand-alone system this will be the c:\QSPro folder.
§
On
a network this will be a mapped drive letter.
2.
Name
one of the new sub-folders “CCNew” and the other new sub-folder “CCArch” (these
are recommended names, you may use something else, if you wish).
3.
Open
the Postech CCapture software. Go to
the File menu and select “Setup Globals”.
Click the “System” tab. Type in the path to the CCNew folder that you’ve
just created. CCapture will now create
the new CC files here.
§
Stand-alone
systems path: c:\Qspro\CCNew
§
Networked
systems path might be: J:\CCNew
4.
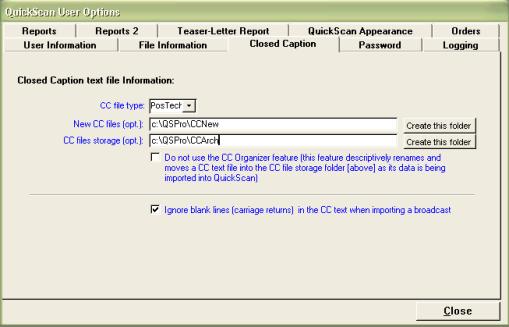
Close
or minimize CCapture, open QuickScan and go to the User Options. Select the “Closed Caption” tab and then
type in the path to the CCNew folder in the box labeled “New CC files…” and
then type the path to the CCArch folder in the box labeled “CC file storage…”.
Enter the location where the new CC files
will be created and a location where the CC files will be stored after the
stories have been imported into QuickScan.

With
these things setup CCapture will know where to create the CC files and
QuickScan will know where to find them to import and parse the news stories.
Import Method 1 - Enter Delimiters Manually in QuickScan
This method will allow you to import the text from a broadcast’s CC file and manually separate it into stories using QuickScan’s easy-parse screen.
1.
Be
sure that you have no delimiter or parse interval entered in the
Broadcasts database (shown above in Initial Setup – Step 1) for the broadcasts
you want to import with this method.
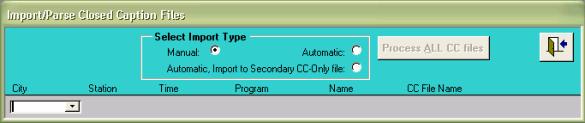
2.
Click
the CC Entry button on QuickScan’s main menu screen and select “Manual” from
the options on the Import/Parse screen.
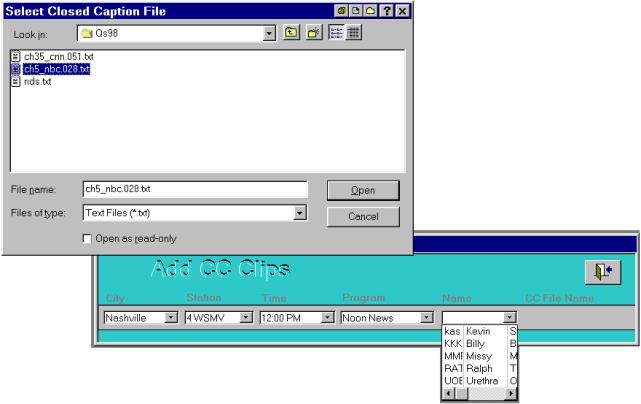
3. Enter the City, Station, Time, Program and Operator’s name. After the operator’s name is selected a Select File dialog box will open where you may select the CC file that you intend to import. Important: It is very important that you select the file that correctly matches the City, Station, Time and Program that you just entered. If you don’t, you’ll be putting the wrong broadcast information on every story record that’s imported for this broadcast.
Be sure to select the CC file that correctly
matches the broadcast information you selected!![]()

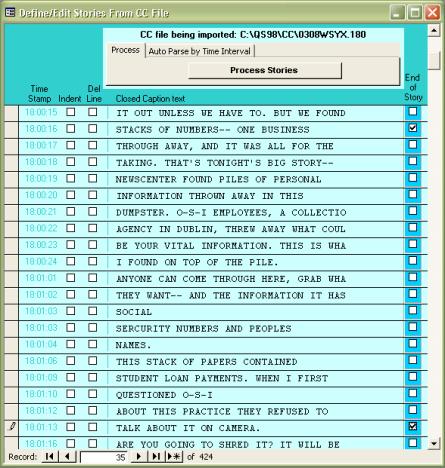
4. After selecting a CC file the screen below will appear with lines of closed caption text from the CC file. Simply read through the story and click with the mouse to place a check in the box to the right of the last line of each story. One line or multiple lines can be kept from importing by using the ‘record selectors’, which appear as gray boxes to the left of each line and then using the delete key on the keyboard. You may also use the “Del Line” check box, which will eliminate the line of text later, during the story processing. Use the <Page Down> key on your keyboard to quickly move through the stories. Editing of the text may also be performed in this screen.
Use the ‘record selector’ boxes to quickly
select single or multiple lines of CC text for deletion Place a check in the box to the left of the
last line of the story
![]()
![]()

5. When checks have been placed in all of the boxes at the end of each story the logger clicks the “Process Stories” button, which parses each story into a record in the database and then displays the stories in the screen shown below where they may be edited further or appended to the permanent clip file.
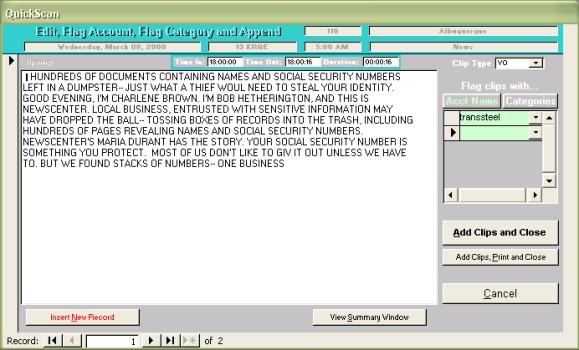
6. When the CC Edit and Append form, shown below, becomes visible, you can perform more edits on the CC text or you may add summary and visual information in the Summary/Visuals field. The Summary/Visuals field becomes visible when “Show Summary Window” button is clicked. You may wish to ignore this field and add the extra information directly to the CC text itself so it will appear in subsequent reports. In this screen you may also add ‘flags’ to each story record (‘Clip Types’, ‘Clip Categories’, ‘Account Name’), run the spell checker and then append the new clip records to the main data file.

![]()
Add ‘flags’ to a story that can be used later
to identify a story with the QuickScan Search Engine

7.
At
this point, when the “Append Clips and Close” button is clicked, the original
CC file that is being parsed and imported will be renamed and moved to an
archive folder for safekeeping.
Import Method 2 - Enter Delimiters
Manually outside of QuickScan then Import Automatically

With
Method 2 you enter story delimiter characters directly into a CC file using a
text editor, such as Windows Notepad or WordPad. Once the delimiters have been added to your
CC files you can easily import a large number of them into QuickScan with the
click of a single button. This method
might be used as an alternative to Method 1.
1.
Decide
on the parse interval that you’ll use to show the end of each news story (such
as: >>>). In
QuickScan’s Broadcast database type these delimiter characters into the “Delimiter”
field of those programs you’ll be editing and importing. Close or minimize
QuickScan.
2.
Open
a CC file with your favorite text editor, such as Windows Notepad (if the CC
file is too large for Notepad it will be opened automatically in WordPad).
3.
Optional: Delete any extra lines from the text that may precede the start of
the newscast. These only add clutter to
the database. You should also remove
the time codes to the left of the deleted lines. Be careful not to
change any of the header information that appears above the story text!
4.
Go
to the end of the first story and type the delimiters that you decided on in
step one (such as: >>>).
5.
Now,
with your mouse, drag the cursor over the delimiters and Copy them (you can use
the <Ctrl> and <c> keys on your keyboard for a quick copy command
or go to the Edit menu and select “Copy”).
6.
Go
to the end of the next story and place your cursor there by clicking that spot
with your left mouse button. Paste the
delimiters here (use the <Ctrl> and <v> keys on your keyboard for a
quick paste command or go to the Edit menu and select “Paste”).
7.
Go
to the end of the next story and paste delimiters there (the delimiters
you copied in the last step will remain in the Windows ‘clip board’ so there is
no need to copy again). Continue with
this process until you have placed a delimiter at the end of each story in the
file.
8.
Optional: Remove any extra lines that appear after the last story. You should also remove the time codes to the
left of these deleted lines.
Be careful not to change this ‘header’
information when editing a CC file in a text editor such as Notepad! You may want to have employees remove ‘junk’
characters as they’re adding delimiters to the CC file. Tip: Hire work-from-home employees to add
story delimiters, titles and visuals to your CC files and then have them
email the edited files into your office where they can be quickly imported
into QuickScan!
![]()


9.
When
you have finished editing the CC file save the changes and open the next CC file
you want to work on. Repeat the steps
above for each remaining file.
10.
Once
the story delimiters have been added to all of the CC files it’s time to import
them into the QuickScan database. To do
this click the “CC Entry” button on QuickScan’s main menu screen and then
select the “Automatic” option on the Import/Parse screen.
11.
Click
Continue.
12.
After
a short while a screen will appear with a log of all of the files that were
imported into the database. For your
convenience, this log may be printed, faxed or emailed and is a handy tool for
troubleshooting should you need technical support.

Import Method 3 – Auto Parse by Time Interval or Delimiter then Import Automatically
This
method assumes that you are not planning to edit the closed caption text in a CC
file prior to importing it into the QuickScan database. This method also assumes that the closed
caption text you are importing has delimiter characters already in the text or
that you have chosen to parse the closed caption text by some interval of time
where there are no delimiters. This is
by far the quickest method for importing data although there are caveats.
1.
In
the Broadcasts database mentioned earlier a delimiter character or a time
interval should be entered for each broadcast.
QuickScan will import the file according to these settings. If these
fields are left blank, QuickScan will not import the file.
2.
Open
the Import/Parse screen by clicking the “CC Entry” button on QuickScan’s main
menu and select the “Automatic” option.
3.
Click
Continue.
4.
After
a short while a screen will appear with a log of all the files that were
imported into the database. For your
convenience, this log may be printed, faxed or emailed and is a handy tool for
troubleshooting should you need technical support.
Alternate Import location for CC records
This is an option that is selected in the CC Import/Parse screen and is intended for news monitors who primarily log the news manually but want to use closed caption text as a backup or additional source of data. By selecting this option stories that are imported from CC files are placed into a file called CCCurrent.mdb (normally, data inputted into QuickScan goes into the Current.mdb file). This option should be used ONLY if you intend to use the CC data as a secondary data source.
For example: This feature should not be used if you log most of the news manually but want to use only closed captioning for the morning programs (although it might be used to import the afternoon and evening programs that are also being logged manually).
To search in the Alternate CC database “Other” must be selected from the “Current, Archive, Other” option box of the QuickScan search engine screen. When this option is selected a select-file dialog box will open where the CCCurrent.mdb file must be selected (the CCCurrent.mdb file will be located in the same folder as all of the QuickScan data files. This is the C:\QSPro folder on stand-alone systems and it will be in the common network file folder for network users).
In conclusion:
- If you looking for pure
speed and the broadcasters in your market provide story delimiters, use Method
Three.
- If you’re looking for
speed but some or none of the broadcasters in your market provide
delimiters, use Method Three with a combination of delimiter parsing,
when available, and parsing by a time interval. The caveat here is that those broadcasts that are parsed by
a time interval will not have accurate beginnings and endings. Another caveat is that all of the
stories in the broadcast will appear to have the same time length – the
length you chose to parse by. This
is a problem if you have clients who are looking for an accurate
representation of the news stories’ media value because this is calculated
in QuickScan using the length of a clip in relation to the cost of a
30-second advertisement on that particular program.
- If your market
broadcasters do not provide delimiters and you’re looking for a cleaner,
more accurate product for reports, you’ll probably want to use Method
One or Two. You may need to
try each one of these methods to decide which of the two works best for
you. These two methods, although
they might appear to be somewhat tedious, actually go quite quickly and,
depending on how much editing and touching up you want to do, can go as quickly
as five minutes labor for every thirty minute broadcast.